
anatomymechanicstherapy.com ↗

Free starter program

Your shoulder blade isn't weak.
It lost its anchor.

Three exercises, 14 days, about eight minutes a day. Built around the one muscle that holds your shoulder blade flat against your ribs, and the reason it quietly stopped doing it.

3 exercises 14 days No equipment Beginner
FRONT SPINE LIFTS OFF

WingedLooking down through the chest. The inner edge of the blade peels away from the rib cage, because nothing underneath is holding it down.

FRONT SPINE HELD FLAT

AnchoredThe serratus runs around the rib cage and pulls that inner edge tight to it. Flat blade, stable base, an arm that has something to push from.

01  /  The mechanism

What the serratus is actually for

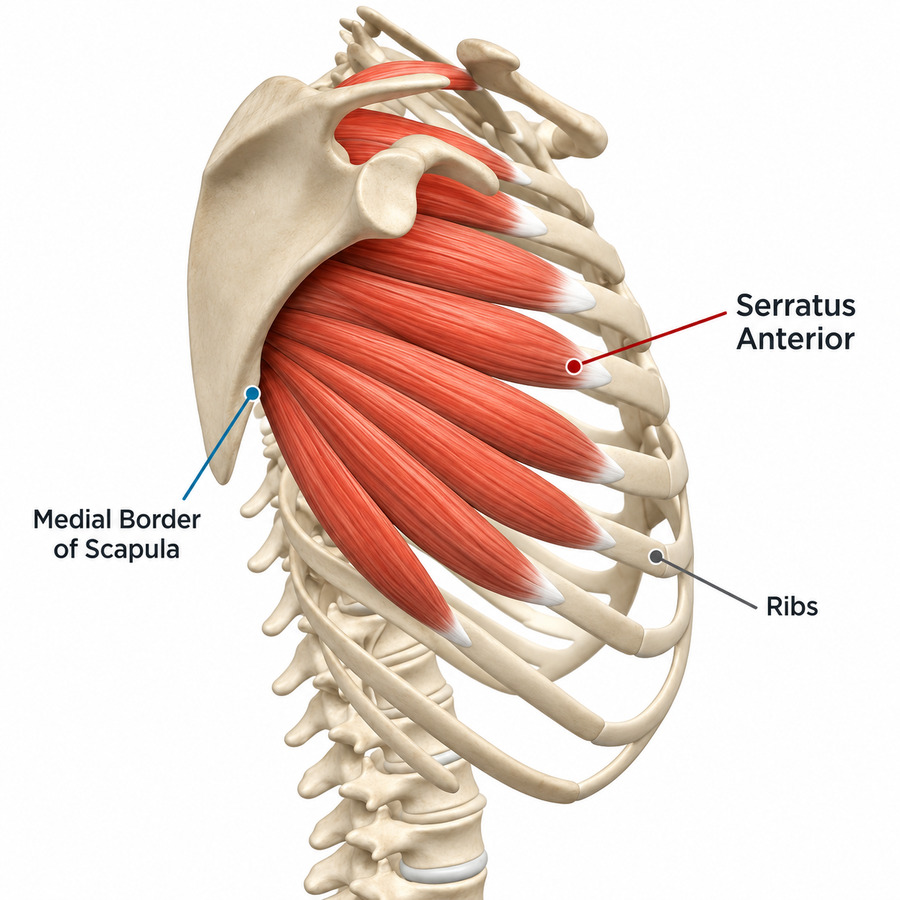
Your shoulder blade doesn't attach to your skeleton anywhere except one small joint at the collarbone. It floats on the back of your rib cage, held there entirely by muscle. The muscle doing most of that holding is the serratus anterior.

It starts on the side of your ribs, under your armpit, and wraps backward around the cage to grab the entire inner edge of the shoulder blade from underneath. That wrap is the whole design. When it pulls, it doesn't yank the blade backward. It presses it flat and slides it around.

Anatomical view of the right rib cage and shoulder blade from the side. The serratus anterior is shown in red as a fan of nine muscular slips running from the ribs, around the cage, to the medial border of the scapula.
Side view · right shoulderNine separate strands, one for each rib, all meeting on the inner edge of the shoulder blade. Every one of them passes underneath the blade to get there, which is why you can't see it working and can't feel it the way you feel a bicep. The top strands run almost straight sideways. The bottom ones angle down and forward. That fan shape is what swings the socket upward when you reach overhead.

It has three jobs, and you need all three. It holds the inner edge flat to the rib cage. It rotates the socket upward so your arm can travel overhead. And it tips the top of the blade backward so the shoulder doesn't dump forward when you reach.

Lose it and the blade lifts at the inner edge. That's the wing. But the wing is the symptom people notice last. What comes first is a shoulder that aches at the front after a long day, an arm that feels like it runs out of room overhead, and a neck that's doing work it was never meant to do.

Nothing you press, carry or throw is stronger than the thing it pushes off. Your arm pushes off your shoulder blade, and your shoulder blade pushes off the serratus.

Here's the part that matters: it is rarely weak in the way you'd expect. Tested on its own it usually has plenty of strength. The problem is that it's outnumbered, and the thing it pulls against keeps moving.

02  /  Why it stopped

Four muscles are pulling the other way

Every one of these is a normal, useful muscle. The trouble is what you do all day feeds all four of them and starves the one holding the blade down.

Pectoralis minor

Front of the shoulder

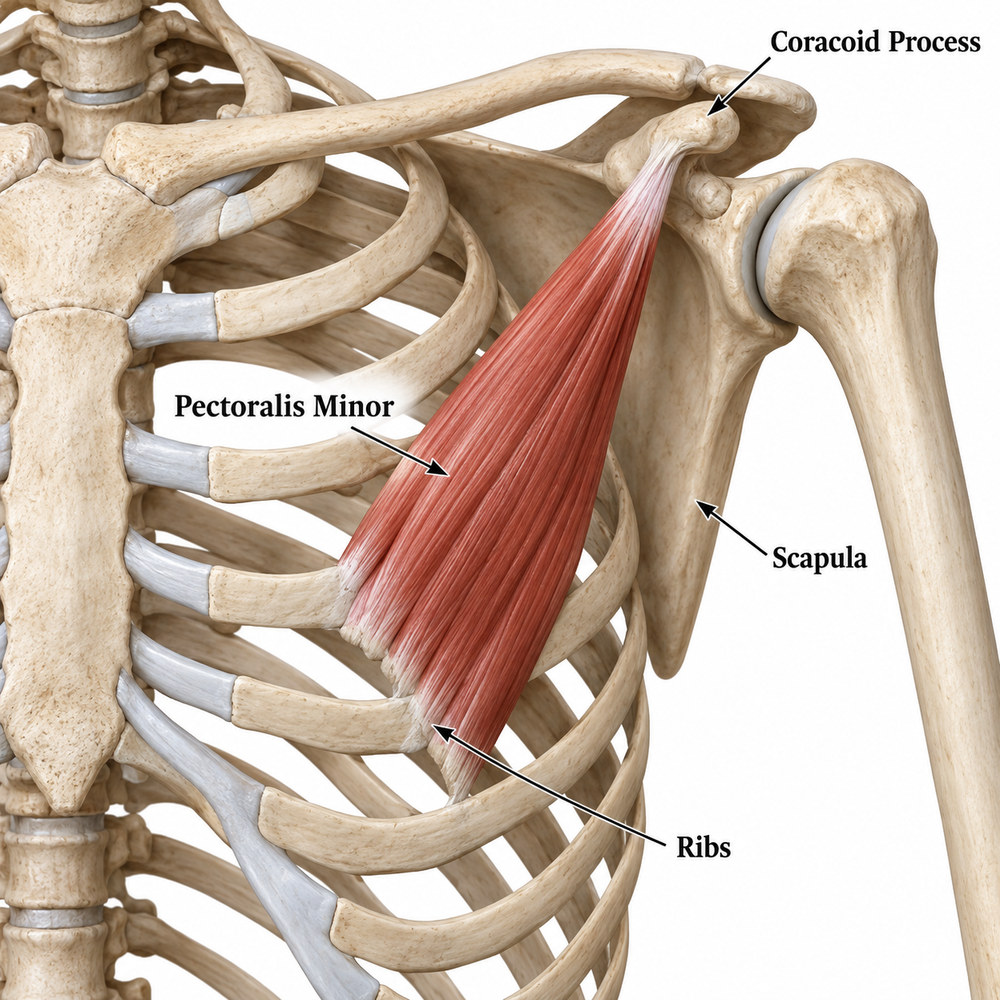
Anatomical view of the chest from the front. Pectoralis minor is shown in red running from the third, fourth and fifth ribs up to the coracoid process, a hook on the front of the shoulder blade.
Ribs 3 to 5, up to a small hook on the front of the blade

Runs from your ribs up to a hook on the front of the shoulder blade. When it shortens it tips the top of the blade forward and down, which lifts the bottom inner corner straight off your back. This is the biggest cause of a wing that isn't a nerve problem.

Fed byEight hours with your arms out in front of you, and sleeping curled on one side with that arm tucked under you.

Levator scapulae

Side of the neck

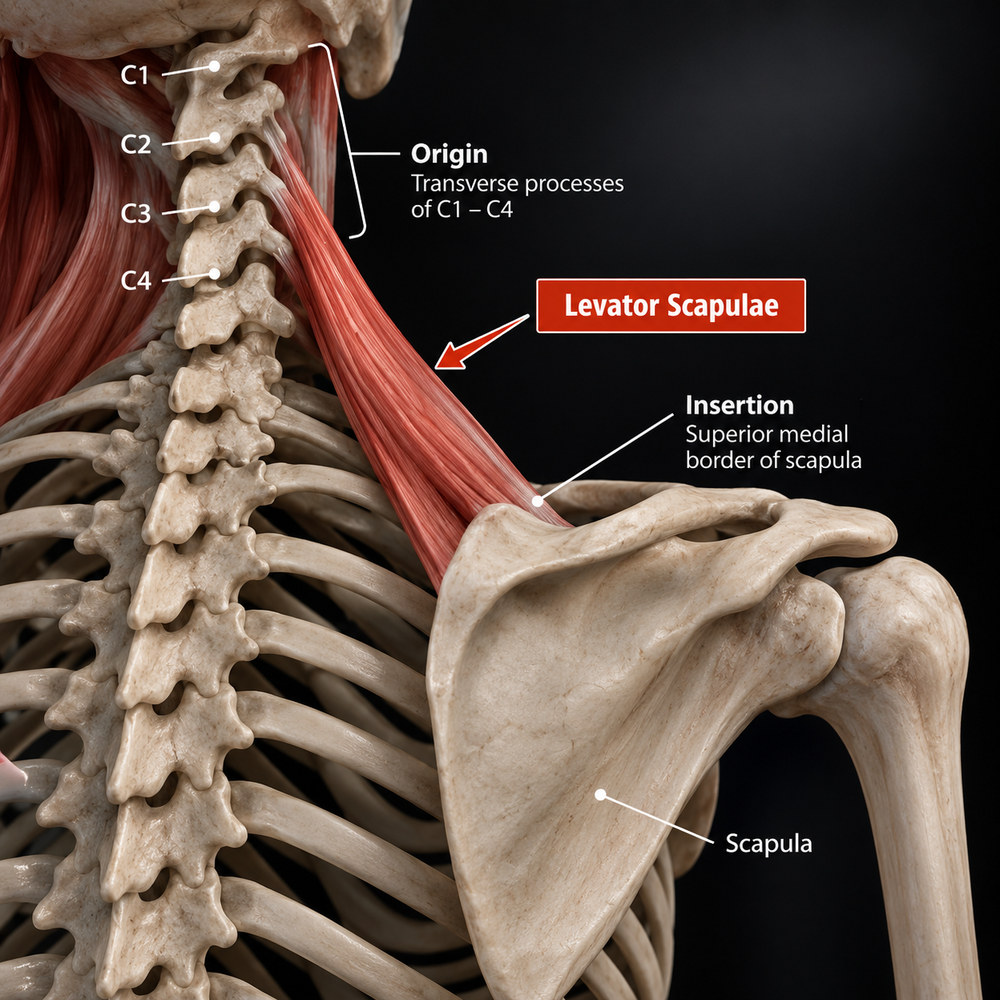
Anatomical view of the neck and upper back from behind. Levator scapulae is shown in red running from the transverse processes of the first four neck vertebrae down to the top inner corner of the shoulder blade.
The top four bones of your neck, down to the top inner corner of the blade

Hikes the top inner corner of the blade upward and turns the socket down, the exact opposite of what the serratus does. Your arm runs out of room overhead, so you arch your back to get it up instead.

Fed byA bag on one shoulder, a phone pinned to your ear, and the shrug you hold all day without noticing.

Upper trapezius

Top of the shoulder

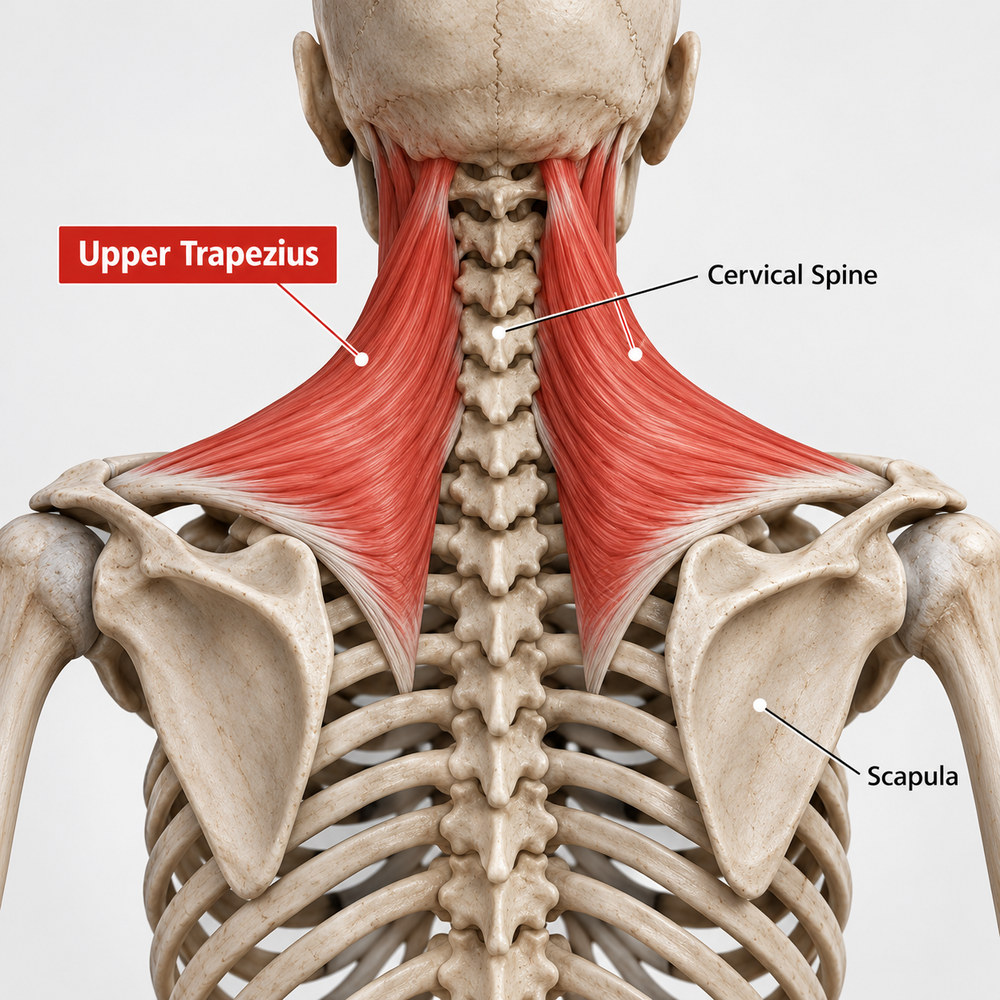
Anatomical view of the neck and upper back from behind. The upper trapezius is shown in red fanning from the base of the skull and the neck vertebrae out to the collarbone and the tip of the shoulder.
Base of the skull and neck, out to the collarbone and the tip of the shoulder

Lifts the whole blade toward your ear. It's meant to work with the serratus to rotate the blade up. When the serratus is quiet it just lifts, so your shoulder goes up instead of around.

Fed byHands high on the steering wheel, a desk an inch too tall, and a week you'd rather not talk about.

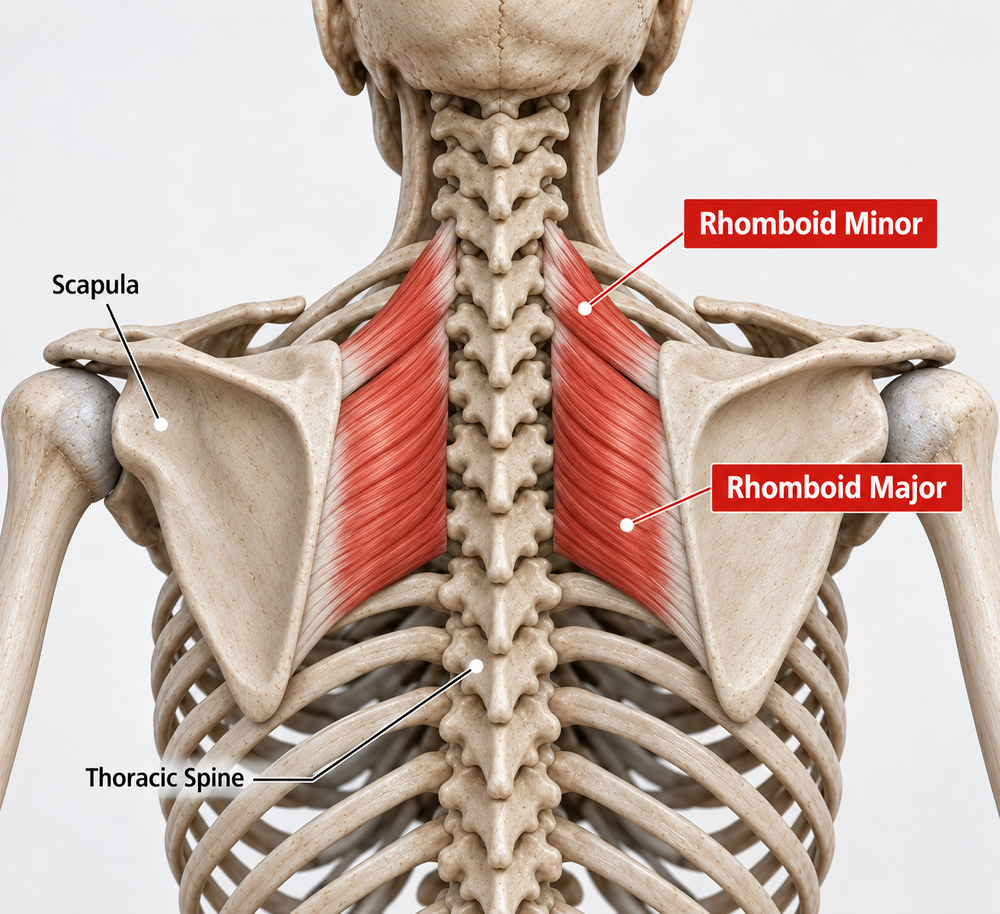
Rhomboids

Between the blades

Anatomical view of the upper back from behind. The rhomboid major and minor are shown in red running from the spine of the upper back out to the inner edge of each shoulder blade.
Your upper back bones, straight out to the inner edge of the blade

Pull the blade in toward your spine and rotate the socket down. Usually the result of good intentions. They're what switches on when you try to fix your posture, and they work directly against the muscle you're trying to wake up.

Fed by"Pull your shoulders back," and a training week that's all rows and pulls with nothing that presses away from you.

Four muscles pulling the blade up, in, and forward. One pulling it flat and around. That's not a fair fight, and you spend all day feeding the four.

And then there's the anchor

The serratus starts on your ribs. That's the end that's supposed to stay put. If your rib cage is flared, meaning it sits open and never fully empties, then that end of the muscle has moved and tilted, and it can't pull properly from there. You end up trying to strengthen a muscle whose foundation is sliding around.

This is why the exhale shows up in all three exercises below. Ribs down first, then press. In that order, every time.

If your ribs flare too

Winging doesn't mean you have a rib flare. Plenty of people have one without the other. But if you can hook your fingers under the bottom edge of your ribs, your chest always feels slightly puffed, and your low back never quite relaxes, run The Rib Flare Reset alongside this one. It's free too, it's about ten minutes, and it fixes the anchor while this fixes the sling.

03  /  Baseline

Film your back once before you start

Takes a minute. It's the only way you'll know on Day 14 whether anything moved, because you cannot see your own back and you will not trust a feeling.

A

The wall press

Shirt off or a tight shirt. Hands flat on a wall at chest height, elbows straight. Lean in so the wall takes some of your weight, then press yourself away from it. Do that four or five times, slowly, with the camera on your back from about six feet behind you. Prop the phone on a shelf if nobody's around.

B

Arms overhead

Same camera position. Raise both arms straight overhead and lower them, twice, slowly. The blades should turn as the arms go up, the bottom tip swinging out and around toward your armpit.

C

Now watch it back

You're looking for three things. The inner edge of a blade peeling off your ribs like a small fin. A blade riding up toward your ear instead of sliding around. Or, on the overhead test, a blade that barely rotates while your low back arches to make up the difference. Note which side is worse, because Exercise 01 is done on that side and nothing else on this page tells you which arm to use.

Save the clips somewhere you'll find them. You retake both on Day 14, same spot, same angle.

04  /  The protocol

Three exercises, in this order

The order is load. The first takes gravity out so you can find the muscle at all. The second stands you up and adds the overhead job. The third puts your body weight through the arm. The first two pick a side and are done with the arm on your winging side. The third is the same on both. Don't jump ahead, because the third is useless if you can't do the first.

Before you watch these

Winging does not mean you have a rib flare. You will hear me say rib flare in these clips, and one of them is shared with my rib flare program. That is because the same positions happen to address both, not because one causes the other. They do turn up together often, since both trace back to where your rib cage sits. But plenty of people wing with no flare at all, and plenty of people flare with no wing. If your ribs are fine, ignore that part and follow the cues.

Before every rep

Exhale all the way out first, then press. The ribs have to settle before the serratus has anything to pull against. If you only take one thing from this page, take that.

Exercise 01  ·  Find it

Supine Arm Reach

Watch the supine arm reach on YouTube ↗

Position
On your back
Side
Your winging side
Equipment
None
Dose
6 reaches × 3
Tempo
5s out / 3s hold
Frequency
2× daily
Time
~4 min

Why it's first

The floor does two things for you. It holds your rib cage still, so the anchor can't wander. And it gives the shoulder blade a surface to press into, so you get feedback about where the blade is. Standing up, you have no way of sensing that. Most people feel the serratus for the first time here.

It is also the only exercise on this page that picks a side. You reach with the arm on the side that wings, because that is the blade nothing is holding down. Doing it with both arms at once lets the good side carry the movement, which is exactly what you are trying to stop.

How to do it

  1. Lie on your back, knees bent, feet flat on the floor.
  2. Raise the arm on your winging side straight up toward the ceiling, wrist stacked over that shoulder, palm facing in. Left blade winging, left arm. Right blade winging, right arm. Your other arm rests on the floor at your side, palm up.
  3. Exhale slowly through pursed lips for five seconds and keep going past where you'd normally stop. Let your ribs settle toward the floor. Your low back should get closer to the floor, not further from it.
  4. At the bottom of that exhale, reach that hand straight up toward the ceiling. Straight up, not forward over your face. Let that shoulder blade come an inch off the floor and slide wide around your rib cage.
  5. Hold the reach for three seconds with the air still out. That hold is the exercise. Everything before it is setup.
  6. Lower the blade back to the floor over three seconds. Inhale quietly through your nose without letting your ribs pop up or your back arch. Then go again.

Both sides winging, or you can't tell from your Day 1 clips? Run the full set on one side, rest, then run it on the other. Never both arms at once. One blade at a time is the whole point.

You've got it when

A warm, working feeling along the side of your ribs under that armpit, and spread across the back of that shoulder. Low back stays down the whole time. The other shoulder stays heavy on the floor. Neck and jaw completely quiet.

You've lost it when

Your ribs lift and your back arches off the floor as you reach. Your head comes up. Your whole body rolls toward the reaching arm instead of the blade moving on its own. Your shoulder travels toward your ear instead of your hand travelling to the ceiling. Or you feel it in the front of the shoulder. Reset, take less range.

Exercise 02  ·  Take it upright

Standing Wall Serratus Press

Watch the standing wall serratus press on YouTube ↗

Position
Standing, facing wall
Side
Your winging side
Equipment
A wall
Dose
8 presses × 3
Tempo
3s press / 3s hold
Frequency
1 to 2× daily
Time
~3 min

What it adds

Upright, with a little load, and it adds the job the floor version never asks for: turning the socket upward as the arm goes up. That's the part you lose first and miss most. Almost everything overhead depends on it, from a high shelf to pulling a shirt over your head. Same arm as Exercise 01, for the same reason: two hands on the wall and the good side quietly takes over.

How to do it

  1. Stand facing a wall about a forearm's length away, feet under your hips and square to the wall.
  2. Put the hand on your winging side flat on the wall at chest height, elbow straight but not locked. Left blade winging, left hand. Right blade winging, right hand. Your other arm hangs at your side.
  3. Let your weight lean into that hand so the wall is carrying some of you, and let that blade drift back toward your spine. That's the start position, not the finish.
  4. Exhale, and press the wall away without bending your elbow. That shoulder travels back an inch or two and the blade slides around your ribs. Hold three seconds.
  5. Keeping that press, slide the hand slowly up the wall to somewhere between eye and forehead height. Don't let the blade collapse back, and don't let your ribs push forward through the front of your shirt as the arm rises.
  6. Slide back down, release, and repeat.

Both sides winging, or still can't tell? Full set on one side, rest, then the other. Same rule as Exercise 01.

You've got it when

The same wrap under that armpit as Exercise 01, plus a sense of the blade travelling around and up rather than hiking. Hips stay square and the free shoulder stays level. Ribs stay stacked. The wall takes the lean, not your low back.

You've lost it when

Your elbow bends. Your torso twists so the free shoulder swings backward and the wall arm does less work. Your shoulder shrugs toward your ear. Your low back arches and the ribs flare forward as the hand goes up. Or your chin pokes at the wall. Come back down to chest height and stay there for a few days.

Exercise 03  ·  Load it

All-Four Belly Lift

Watch the all-four belly lift on YouTube ↗

Position
Hands and knees
Equipment
None
Dose
6 presses × 3
Tempo
3s press / 3s hold
Frequency
1× daily
Time
~3 min

What it adds

Your body weight, straight down through the arm. This is where it stops being a movement lesson and becomes strength, and it's the closest thing here to what your shoulder actually has to do when you push, carry, or hold yourself up. It's last for a reason: if you can't find the blade lying on the floor, you will not find it here.

How to do it

  1. Hands and knees. Hands directly under your shoulders, knees under your hips, elbows straight.
  2. Exhale everything out through pursed lips, drawing your belly up toward your spine as the air leaves. Let your low back round slightly and tuck your tailbone under. Nothing should be arched, front or back.
  3. Without bending your elbows, push the floor away and let the space between your shoulder blades rise toward the ceiling. Your whole upper back lifts about an inch. Head stays in line, eyes on the floor between your hands.
  4. Hold at the top for three seconds, air out, belly still drawn up.
  5. Lower halfway, stopping before your back starts to sag, and press again. Inhale into your back at the top, widening between the blades from the inside.

Once this is easy and the rounded position holds without you thinking about it, take it to a plank on your hands and do exactly the same press there.

You've got it when

The work is spread across your upper back and under both armpits, and it stays there for the whole hold. Elbows dead straight throughout. You can still breathe through your nose.

You've lost it when

Your elbows bend and it becomes a small push-up. Your mid back sags between the blades. Your shoulders creep toward your ears, your low back arches, or you hold your breath to get it done.

05  /  14 days

How to run it

Days 1 to 4
Exercise 01 only, twice a dayMorning and night. Nothing else. You are learning what the muscle feels like, and loading it before you can feel it just trains the compensation.
~8 min/day
Days 5 to 9
01, then 02, once a dayPlus 01 on its own before bed. Keep the wall press at chest height if the overhead slide costs you the position.
~11 min/day
Days 10 to 13
All three, in order, once a day01 stays first every single session, as the warm-up that finds the position before you load it.
~10 min/day
Day 14
Film it again, then read the resultSame spot, same angle, same two tests as Day 1. What you see is what decides your next step, and it is the whole reason the baseline clips were worth taking.
2 min

Miss a day and you pick up where you left off. This is not the kind of thing that resets. Fourteen days is short on purpose: long enough for the muscle to show up, short enough that you find out where you stand before you lose interest.

06  /  The rest of the day

Three small changes worth more than the exercises

Ten minutes of training against fifteen hours of habit is a losing trade. None of these cost you any time.

01

Stop pulling your shoulders back

The most repeated posture cue there is, and it trains the two muscles already winning. Swap it for wide across the back. Same intention, opposite muscles.

02

Take the bag off your shoulder

A shoulder strap only stays up there because you're holding a shrug to keep it. Both straps of a backpack, or carry it in your hand and let the arm hang long.

03

Move the laptop, not your arms

If your elbows sit out in front of your ribs all day, your blades are holding your arms up for eight hours. Bring the keyboard in and rest your forearms on the desk.

07  /  The honest part

When it isn't this

The serratus runs off one long, exposed nerve called the long thoracic, and it's one of the more commonly injured nerves in the body. When that nerve is the problem, the wing is dramatic, it appeared over days or weeks rather than years, and no exercise on a web page is the answer. That case needs a proper diagnosis, and waiting costs you recovery.

Get it looked at, not trained, if

  • The winging showed up suddenly, over days or a few weeks, especially after a virus, a vaccination, surgery, or a blow to the shoulder or neck.
  • Serious shoulder or neck pain came first, then the weakness followed it.
  • You can't raise your arm to shoulder height, or you can't hold it there once it's up.
  • There's numbness, pins and needles, or grip weakness in the hand on the same side.
  • The bottom tip of the blade swings out sideways rather than the inner edge lifting up. That's a different nerve, and it wants a different answer.

And the ordinary limit: this program is symmetrical, and you almost certainly aren't. Most people have one side clearly worse than the other. Fourteen days gets the muscle back on the map for most people, which is all this is for. What it cannot do is tell you why one side stays stuck. That part shows up in the retest, and it is the next thing on this page.

08  /  Day 14

What the retest tells you

Put the new clips beside the ones from Day 1. There are only three answers, and they point in three different directions.

The clean result

Both sides changed

The inner edges sit flatter against your ribs, and both blades turn as your arms go up. Keep all three going for another two weeks, then take Exercise 03 to a plank and live there.

You are fine on your own from here.

Most common

One side changed, the other didn't

This is where most people land, and it is the one thing a free program cannot sort out. These three exercises are identical on both sides. You are not. Whatever is holding that side is specific to you, and from here you would be guessing at it.

This is exactly what an assessment is for.

Stop and look

Nothing changed

Either the positions are off in a way you can't catch on your own footage, or something other than a quiet muscle is driving it. Running the same 14 days again rarely changes the answer. Read the red flags above first.

Get eyes on it before you repeat it.

One side worse than the other is the normal finding, not the exception. If that's you, you ran the program correctly and it told you something useful.

Free · The other half of it

Want the rib flare program too?

Three exercises, three weeks, about ten minutes a day, built around a complete exhale. If your ribs sit up and open, this is the anchor your serratus has been missing. Drop your email and the link comes straight back.

One email with the link. I won't pass it on, and I won't send anything else unless I build something worth your time.

Please read. This program is general educational information, not medical advice, and it isn't individualized to you. It is not a diagnosis and it's not a substitute for evaluation by a licensed healthcare provider. Scapular winging can be caused by nerve injury, and that requires proper medical assessment. See the red flags above. Stop immediately if anything causes pain, numbness, tingling, dizziness, or shortness of breath. Talk to your doctor before starting if you have had a recent shoulder, neck, or chest injury or surgery, or any known nerve, cardiac, respiratory, or spinal condition. By using this program you accept that you do so at your own risk.